Book Appointment Now


Rubber Compression Molds: A Complete Guide
Learn how a rubber compression mold works, its key benefits, common challenges, and expert tips for precision manufacturing success in 2026. Discover essential.
| Key Insight | Explanation |
|---|---|
| What it is | A rubber compression mold uses heat and pressure to shape uncured rubber into precise, finished parts inside a closed cavity. |
| How it works | A preformed rubber “charge” is placed in the mold, which is then closed under hydraulic pressure and heated until the rubber vulcanizes. |
| Key advantage | Low tooling costs and minimal material waste make compression molding highly cost-effective for low-to-medium production volumes. |
| Common materials | Natural rubber, EPDM, silicone, neoprene, and nitrile are all routinely processed using compression molding. |
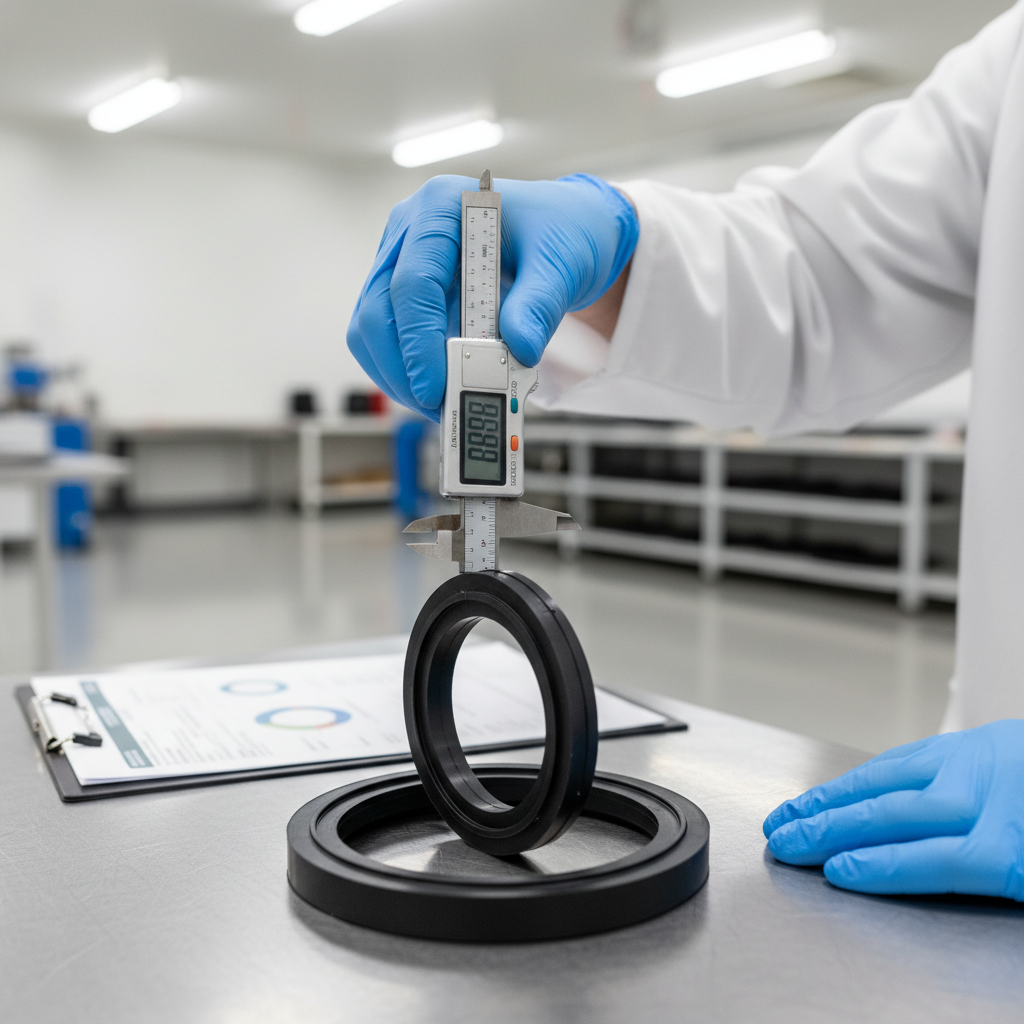
| Typical tolerance | Standard rubber compression molds hold tolerances of ±0.1–0.25mm; precision tooling can achieve tighter specs depending on compound and design. |
| Industry use | Widely used in automotive sealing, medical devices, aerospace gaskets, and consumer products as of 2026. |
Understanding this approach is essential. A this strategy is one of the oldest and most reliable tools in precision manufacturing. It shapes uncured rubber into finished components using a combination of heat and hydraulic pressure. Simple in concept, but demanding in execution. This guide covers everything a procurement manager, engineer, or product developer needs to know: how the process works, why it’s still widely used in 2026, what pitfalls to avoid, and how to get consistent, high-quality results from every production run.
What Is a Rubber Compression Mold?
A this approach is a two-part or multi-part tooling system that uses heat and compressive force to vulcanize raw rubber into a defined shape. It’s one of the oldest manufacturing methods for elastomeric parts, and it remains highly relevant today.
Definition and Core Concept
According to Wikipedia, “compression molding is a method of molding in which a precise quantity of molding compound containing thermosetting or elastomeric resin called a charge is placed in an open, heated mold cavity.” [1] The mold closes under pressure, forcing the rubber to flow into every contour of the cavity before curing into its final form.
The process is often compared to making waffles: you place a measured amount of batter (or rubber compound) into a heated mold, close it, and apply pressure until the material sets. Apple Rubber notes that “compression molding is a tried-and-true method of manufacturing simple rubber parts” and that the analogy holds surprisingly well in practice. [2]
A this typically consists of:
- Top plate (force plug): The upper half that applies downward pressure
- Bottom plate (cavity): The lower half that holds the shaped cavity
- Flash groove: A channel that collects excess rubber (flash) squeezed out during pressing
- Ejector pins: Pins that push the finished part out of the cavity after curing
- Heating elements: Integrated channels or platens that maintain precise mold temperature
Why It Still Matters in 2026
Compression molding isn’t new. But it’s still the go-to process for many applications because its economics are hard to beat at low-to-medium volumes. Tooling costs are significantly lower than injection molds. Setup is simpler. And it handles a wide range of elastomers, including materials that are difficult to process any other way.
The global rubber molding market continues to expand, driven by demand from automotive sealing systems, medical device gaskets, and aerospace components. As of 2026, compression molding holds a strong position alongside transfer molding and rubber injection molding for custom part production. [3]
For engineers specifying parts with complex geometries or tight performance requirements, understanding the mold type is essential. The it is often the most accessible entry point, especially for prototypes and smaller production runs.
How Rubber Compression Molding Works
this methoding works by placing a pre-measured rubber charge into a heated open mold, then closing the mold under hydraulic pressure to force the rubber into the cavity shape while vulcanization occurs.
Step-by-Step Process
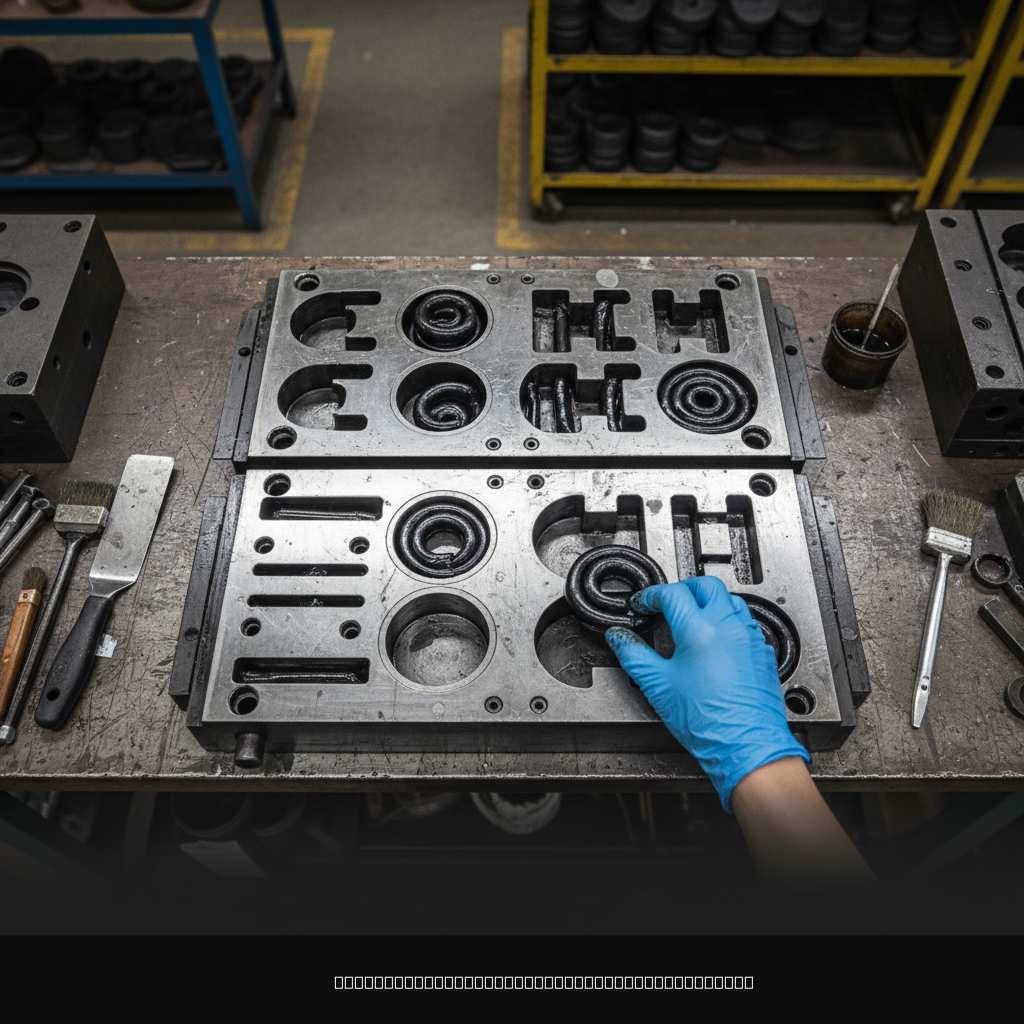
The mechanics are straightforward, but each step requires careful control. Here’s how a standard this strategy cycle runs:
- Compound preparation: The rubber compound (natural rubber, EPDM, silicone, neoprene, or nitrile) is mixed with curing agents, fillers, and accelerators. The compound is then formed into a “preform” or “charge” sized to slightly exceed the cavity volume.
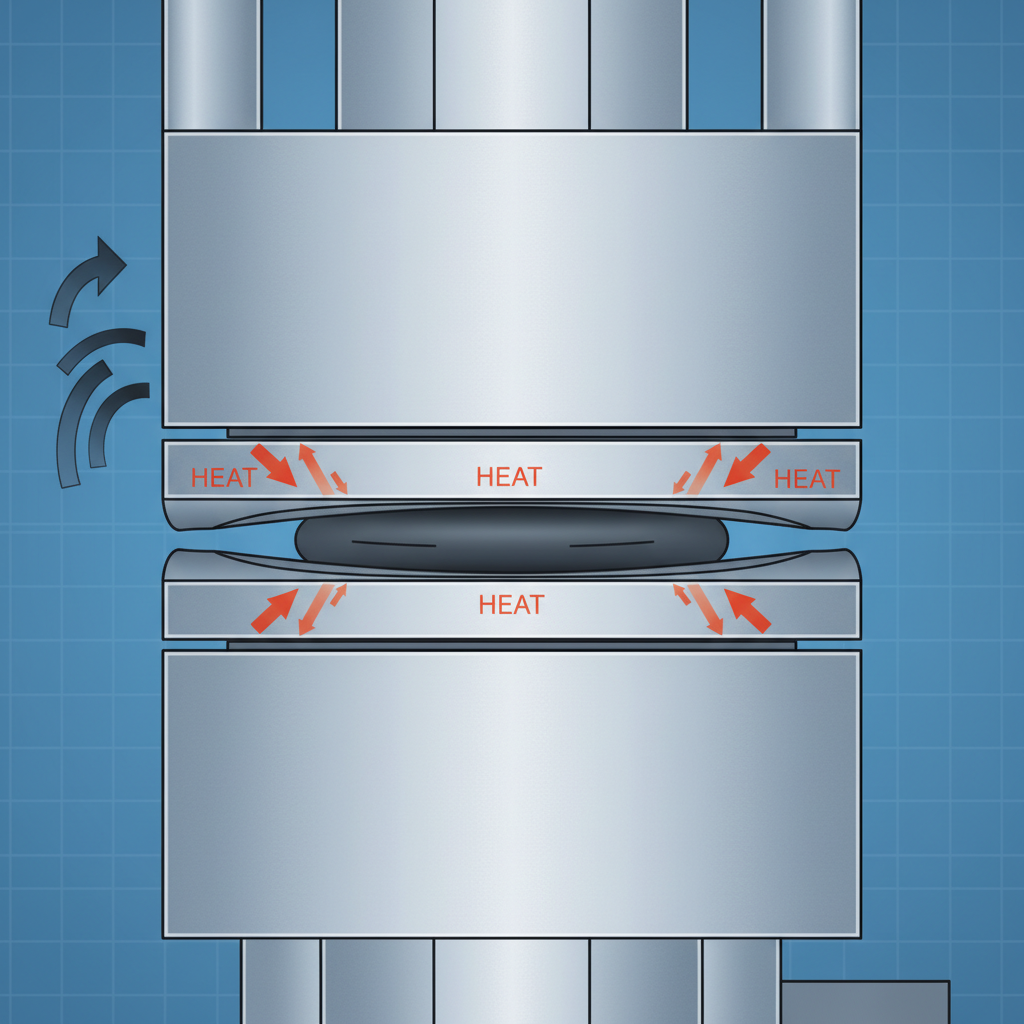
- Mold heating: The mold is preheated to the required cure temperature, typically between 150°C and 200°C (302°F–392°F) depending on the compound. Silicone compounds often cure at 170°C–180°C. [4]
- Charge placement: The preform is placed directly into the open cavity of the lower mold plate.
- Mold closing: The hydraulic press closes the mold, applying pressures typically ranging from 1,000 to 2,000 psi. The rubber flows to fill the cavity completely.
- Vulcanization (curing): Heat and pressure trigger cross-linking of the polymer chains, a process called vulcanization. This transforms the soft rubber into an elastic, durable solid. Cure times vary from 2 to 15 minutes depending on compound thickness and temperature.
- Mold opening and part removal: Once cured, the press opens and ejector pins or manual tools remove the finished part.
- Flash removal (deflashing): Excess rubber that flowed into the flash groove is trimmed away by hand, cryogenic deflashing, or tumbling.
Pro Tip: Size your preform to be 5–10% heavier than the net part weight. Too little rubber leads to short shots (incomplete fill); too much creates excessive flash and longer deflashing time. Getting this balance right dramatically reduces scrap rates.
Key Process Variables
Three variables control part quality in a this approach cycle: temperature, pressure, and cure time. These are sometimes called the “cure triangle,” and adjusting one almost always affects the others.
| Variable | Typical Range | Effect of Getting It Wrong |
|---|---|---|
| Temperature | 150°C – 200°C | Under-cure (soft parts) or over-cure (brittleness, surface cracking) |
| Pressure | 1,000 – 2,000 psi | Low pressure causes voids; excessive pressure causes flash and dimensional distortion |
| Cure Time | 2 – 15 minutes | Short time produces under-cured parts; too long reduces throughput and can degrade compound |
The MIT Fab Lab notes that “compression molding is a method of molding in which the molding material, generally preheated, is first placed in an open, heated mold cavity” and that controlling these variables is central to consistent part quality. [5]
Key Benefits of Rubber Compression Molding
thising offers low tooling costs, design flexibility, and compatibility with a wide range of elastomers, making it one of the most cost-effective options for custom rubber parts at low-to-medium production volumes.
Cost and Tooling Advantages
The tooling for a it is considerably simpler than an injection mold or transfer mold. There are no sprues, runners, or gates to machine. That translates directly into lower upfront cost. For prototype runs or volumes under 50,000 parts per year, compression molds often deliver the best return on tooling investment.
- Lower mold cost: Compression molds typically cost 30–60% less than equivalent injection molds, depending on part complexity and cavity count.
- Faster tooling lead time: Simpler geometry means molds can be machined and qualified faster, often in 2–4 weeks versus 6–10 weeks for injection tooling.
- Minimal material waste: With accurate preform sizing, material utilization is very high. There’s no runner system to scrap.
- Scalable cavity count: A single mold base can house multiple cavities, increasing throughput without proportional cost increases.
Industry analysts at Stockwell Elastomerics note that compression molding is particularly well-suited for “fast-turn requirements and specialty applications” where tooling lead time and cost are critical constraints. [6]
Material and Design Flexibility
Compression molding handles virtually every commercial rubber compound. This is a real advantage when working with specialty materials that don’t flow well through injection gates.
- Natural rubber (NR): Excellent tensile strength, ideal for vibration damping
- EPDM: Outstanding weathering and ozone resistance, widely used in automotive seals
- Silicone: Biocompatible, temperature-stable from -60°C to +230°C, common in medical devices
- Neoprene (CR): Good oil and flame resistance
- Nitrile (NBR): Excellent fuel and oil resistance, standard in hydraulic seals
The process also accommodates rubber-to-metal bonding, where metal inserts are placed in the cavity before molding. The rubber bonds directly to the metal during vulcanization, producing composite parts without adhesives. This technique is widely used in automotive bushings and industrial vibration isolators.
For businesses that need custom rubber components with tight performance specs, compression molding offers a practical path from design to production. If you’re also sourcing precision-machined metal components to complement your rubber parts, you can explore Business Rubber Stamps UAE Company Seals as part of a broader custom manufacturing strategy.
Pro Tip: When specifying a rubber compound for compression molding, always provide the intended service temperature range and fluid exposure conditions to your tooling supplier. Compound selection has a bigger impact on part performance than mold design in most applications.
Common Challenges and Mistakes
The most common failures in this methoding come from incorrect preform sizing, poor mold temperature control, and inadequate flash management — all of which are preventable with proper process setup.
Defects and Their Root Causes
From experience working with manufacturers across multiple industries, a handful of defects account for the majority of quality issues in compression-molded rubber parts:
- Short shots (incomplete fill): The rubber charge is too small, or the mold closes too fast before the rubber flows into all cavity areas. Fix: increase preform weight and slow press closing speed.
- Excessive flash: Too much material in the charge, insufficient clamp pressure, or a worn flash groove. Flash adds deflashing labor cost and can cause dimensional non-conformance.
- Voids and porosity: Trapped air during mold closing. This is especially common with thick cross-sections. A “bump” cycle (briefly opening and re-closing the mold early in the cure) helps release trapped air.
- Under-cure: Insufficient temperature or time. Parts feel tacky, lack strength, and fail dimensional checks. Under-cured parts are a common cause of field failures in sealing applications.
- Over-cure (reversion): Particularly with natural rubber, excessive cure time or temperature causes the compound to revert, becoming soft and sticky. This is called marching modulus or reversion, and it’s a real risk with thick parts.
- Surface blemishes: Contamination on the mold surface, release agent buildup, or compound degradation. Regular mold cleaning with appropriate solvents is essential.
Misconceptions About Compression Molding
A common mistake buyers make is assuming that compression molding is inherently less precise than injection molding. That’s not accurate. The dimensional capability of a this strategy depends primarily on mold quality, compound consistency, and process control, not the molding method itself. [7]
Another misconception is that compression molding can’t handle complex geometries. In practice, undercuts and complex profiles can be achieved with split molds or side actions, though these add tooling cost. For parts that genuinely require complex internal geometries, transfer molding or injection molding may be better options. Knowing which process fits your part is the first decision to make correctly.
According to quality inspection experts at QualityInspection.org, “SCM (Solid Compression Molding) tends to be a more simple process” than liquid silicone rubber (LSR) injection molding, which means it’s often the right first choice for silicone parts that don’t require the tight flash control of LSR. [8]
Best Practices for Rubber Compression Mold Success in 2026
Consistent results from a this approach depend on disciplined preform preparation, rigorous mold maintenance, and process validation aligned with recognized quality standards like ISO 9001.
Tooling Design and Material Selection
Good outcomes start with good tooling. Here are the practices that separate high-performing compression mold programs from problematic ones:
- Use P20 or H13 tool steel for production molds. These grades offer the right balance of hardness, machinability, and thermal conductivity. Softer materials wear faster and compromise dimensional stability over time.
- Design the flash groove correctly. The groove depth and width must match the compound viscosity. A groove that’s too shallow causes excessive back pressure; too deep allows uncontrolled flash.
- Specify surface finish carefully. A mold surface finish of Ra 0.4–0.8 µm (16–32 µin) works well for most rubber compounds. Highly polished surfaces can cause part sticking, especially with silicone.
- Validate the cure curve. Use a rheometer (a device that measures rubber compound flow and cure behavior) to establish the optimal cure time and temperature before committing to production parameters.
- Implement a mold maintenance schedule. Clean molds every 50–100 cycles with an appropriate solvent or mold cleaner. Inspect for wear, corrosion, and parting line damage on a regular basis.
Process Control and Quality Assurance
At GC INDUS, we’ve found that the most reliable compression molding programs share one thing: documented process parameters tied to a validated cure curve. Guessing at temperature and time is how scrap rates climb.
Best practices for process control include:
- Log temperature, pressure, and cure time for every production batch
- Use calibrated thermocouples at multiple mold locations, not just the platen
- Conduct first-article inspection (FAI) on the first 3–5 parts of every run
- Apply Statistical Process Control (SPC) to track dimensional trends over time
- Maintain compound traceability from raw material lot to finished part
For medical device applications, ISO 13485 compliance requires formal process validation, including Installation Qualification (IQ), Operational Qualification (OQ), and Performance Qualification (PQ). These aren’t optional for medical rubber components. They’re the baseline. [9]
Industry experts at Echo Engineering emphasize that “the basics of thising tools” center on matching the tool design to the compound’s flow characteristics, and that “the type of mold used directly impacts part quality and production efficiency.” [10]
Pro Tip: Run a “bump” cycle on thick-section parts (wall thickness over 10mm). Close the mold, hold for 30–60 seconds, open briefly to vent trapped air, then close again for the full cure time. This simple step eliminates most void defects in thick rubber components.
Sources & References
- Wikipedia, “Compression Molding,” 2026
- Apple Rubber, “Understanding Compression Molding,” 2026
- RubberMolding.org, “Leading Rubber Compression Molding Manufacturers,” 2026
- Practical Machinist, “Compression Molding Rubber,” 2026
- MIT Fab Lab, “Molding — MAS.865,” 2018
- Stockwell Elastomerics, “Rubber Compression Molding,” 2026
- ZJMDC, “Rubber Compression Molding: Process, Benefits, and Applications,” 2026
- QualityInspection.org, “Producing Silicone Parts? Compression Molding Could Be For You,” 2026
- EdTech Books (BYU-Idaho), “18.2 Compression Molding,” 2026
- Echo Engineering, “Basics of Rubber Compression Molding Tools,” 2026
Frequently Asked Questions
1. What is a rubber compression mold used for?
A it is used to produce custom elastomeric components including seals, gaskets, O-rings, grommets, vibration isolators, diaphragms, and bumpers. It’s common across automotive, aerospace, medical device, industrial equipment, and consumer product applications where durable, flexible rubber parts are required.
2. How does rubber compression molding differ from injection molding?
In rubber injection molding, the compound is heated and injected under pressure through a gate into a closed mold, similar to plastic injection molding. In compression molding, the uncured rubber is placed directly into the open cavity before the mold closes. Compression molding has lower tooling cost but slower cycle times and more flash. Injection molding suits higher volumes and tighter flash requirements.
3. What materials can be processed in a rubber compression mold?
Most thermoset rubber compounds work well in compression molding, including natural rubber (NR), EPDM, silicone (VMQ), neoprene (CR), nitrile (NBR), fluoroelastomer (FKM/Viton), and butyl rubber (IIR). The process is not suitable for thermoplastic elastomers (TPE/TPU), which require injection molding.
4. What tolerances can a rubber compression mold achieve?
Standard compression-molded rubber parts typically hold tolerances of ±0.1mm to ±0.25mm, depending on part geometry, compound, and mold quality. Tighter tolerances are possible with precision tooling and controlled process parameters, but rubber’s inherent elasticity means achievable tolerances are wider than those for metal machined parts.
5. How long does it take to make a rubber compression mold?
Tooling lead time for a this method typically ranges from 2 to 6 weeks, depending on part complexity, number of cavities, and mold material. Simple single-cavity prototype molds in aluminum can be ready in 1–2 weeks. Full production molds in hardened P20 or H13 tool steel generally take 3–6 weeks.
6. What is flash in rubber compression molding and how is it removed?
Flash is the thin layer of excess rubber that squeezes out of the mold cavity along the parting line during pressing. It’s an expected byproduct of the process. Flash is removed by hand trimming, cryogenic deflashing (tumbling parts in liquid nitrogen to embrittle the thin flash for easy removal), or media blasting. Cryogenic deflashing is the most consistent method for high volumes.
7. Is rubber compression molding suitable for medical device components?
Yes. Compression molding with biocompatible silicone or other medical-grade compounds is widely used for medical device seals, diaphragms, and cushioning components. Manufacturers must follow ISO 13485 quality management requirements, including full process validation (IQ/OQ/PQ) and material biocompatibility testing per ISO 10993. Our team at GC INDUS recommends confirming ISO 13485 certification with any supplier before placing medical rubber component orders.
8. What is the difference between compression molding and transfer molding for rubber?
In transfer molding, the rubber charge is placed in a pot above the mold cavities and forced through sprues into the closed cavities by a transfer ram. This gives better dimensional consistency and less flash than compression molding, and it’s better for complex geometries and rubber-to-metal bonded parts. The trade-off is higher tooling cost and some material waste in the sprue system.
Conclusion
The this strategy remains one of the most practical and cost-effective methods for producing custom elastomeric components. Its strengths are real: low tooling cost, broad material compatibility, and proven performance across automotive, medical, and industrial applications. Its limitations are equally real: slower cycle times, flash management requirements, and wider tolerances than injection processes. Understanding both sides helps you make the right process choice for your specific part.
Success with compression molding comes down to three things: a well-designed mold, a validated cure process, and consistent quality control. Skip any of these, and scrap rates climb fast. Get all three right, and you’ll produce rubber parts that perform reliably in the field.
At GC INDUS, we combine precision CNC machining for mold tooling with rigorous ISO 9001 and ISO 13485 quality systems to support customers who need rubber and elastomeric components that meet tight specifications. Whether you need a prototype mold machined to ±0.001mm or a production-ready compression mold tool for a global supply chain, we deliver precision without compromise. Contact our team for a fast quote on your next this approach project.